This is a small collection of mostly game example source codes. These source codes are made available to help PlayBasic programmers kick start their game programming journey.
Looking for more source code / tutorials & media, then remember to visit the PlayBasic Resource board on our forums.
This is a refactored version of Scotties Voxel Terrain demo published back 2016. I've tweaking the inner loops and data mainly to try and squeeze out from performance from the demos code, adding gouraud shading and depth queues to the terrain.
This version has been refactored and includes various common tips when speed up work heavy loops, as well as a few ideas on speed up voxel, by simply not sampling the ground at the same interval, so the further the ray gets from the camera, the ray is moving in bigger steps. So it's accurate, but the result isn't much different from the simple version. If you going for max speed in PlayBSIC V1.65 then there's still a couple places within the inner loop that could can tweak further..
This is an 'as is' release of the PS3D libraries which are set of high level functions for rendering 3D objects into PlayBasic 2D camera. It includes a simple height map terrain, cube primitives and MD2 loader, allowing the user to create a scene but a lot of necessary high level code is missing for the casual user, collisions for example .
 In this example we look over three methods for doing Pixel Perfect sprite collisions manually in  program code, rather than using the built in sprite collision method (see SpriteCollisionMode) . Â
 Sprite Collision Method 1:  Raw Image (point by point) - The first example computes the common area the two sprites share and then reads the source pixels from the source sprite, checks for a mask colour then does the same for the Destination sprite.  If the two pixels are Not mask colour, then we have a collision.   This method works but there's a lot of surface overhead constantly pulling individual pixels from the surfaces via Point() Â
Sprite Collision Method 2:  Byte Mask (Preprocess images into a 8bit Collision Mask) - The second method actually works almost the same as the first, except this time we create a collision mask of each image. The mask is an 8 bit version of the image, where each byte in the mask is either 0 for transparent or 1 for solid.   The sprite collision routine then  uses the same logic as method #1 but directly reads the mask bytes rather than reading pixels.  This means it doesn't matter what type of image format (video/ FX/ AFX) the cost of reading the mask is the same regardless.
 Sprite Collision Method #3:  Span Buffer (Preprocess the images into a span list of hard pixels only) - The last method we look at is an extension to the mask concept, expect rather than store pixel data, we scan the image and make list of hard spans (none transparent pixels) for each row.  Each span is just two values, the  starting coordinate and length of the span.  The data structure contains a table at the top of offsets into the span list, so we can look up each row as need be.   Rows with no solid pixels, don't create any data, so we're only every comparing solid pixels to solid pixels.  The regions might not overlap, but for most sprites it all boils down to only a couple of compares per row..
Â
 PlayBasic has a number of sprite collision methods built in, ranging from simple bounding box intersections, rotated bounding box,  Vector Shape ( Polygon Collision supporting Convex / Concave & complex polygons),  Various sliding methods through to Pixel Perfect collision mode.
Video
Â
Sample Code
  This is the pixel perfect sprite collision function from the first demo, it basically just computes if the two sprites share a common area and then runs through the pixel data point() by point() exiting when it finds two pixels that aren't mask colour
PlayBasic Code:
; *=---------------------------------------------------------------------=*; *=---------------------------------------------------------------------=*; *=---------------------------------------------------------------------=*; >> Sprite Hit Pixels <<; *=---------------------------------------------------------------------=*; *=---------------------------------------------------------------------=*; *=---------------------------------------------------------------------=*; Â Â This function check if two spites overlap at pixel level. Â ;;; *=---------------------------------------------------------------------=*constant SpriteHitPixels_DEBUG =falsefunction SpriteHitPixels(SrcSprite,DestSprite)
SrcX1 =GetSpriteX(SrcSprite)+GetSpriteHandleX(SrcSprite)
SrcY1 =GetSpriteY(SrcSprite)+GetSpriteHandleY(SrcSprite)
SrcWidth =GetSpriteWidth(SrcSprite)
SrcHeight=GetSpriteHeight(SrcSprite)
DestX1 =GetSpriteX(DestSprite)+GetSpriteHandleX(DestSprite)
DestY1 =GetSpriteY(DestSprite)+GetSpriteHandleY(DestSprite)
DestWidth =GetSpriteWidth(DestSprite)
DestHeight =GetSpriteHeight(DestSprite)// Â Manually check if the two sprites at least share the same area; if(SrcX1+SrcWidth) Â > DestX1
if SrcX1 <(DestX1+DestWidth)if(SrcY1+SrcHeight) Â > DestY1
if SrcY1 <(DestY1+DestHeight)//Status=true// Scan through smallest region  of the two
OldSurface =GetSurface()
SrcImage =GetSpriteImage(SrcSprite)
SrcImageMaskColour =GetImageMaskColour(SrcImage)
DestImage =GetSpriteImage(DestSprite)
DestImageMaskColour  =GetImageMaskColour(DestImage)// Compute the rect the two images share
ClipX1=MaxVal(SrcX1,DestX1)
ClipX2=MinVal(SrcX1+SrcWidth,DestX1+DestWidth)
ClipY1=MaxVal(SrcY1,DestY1)
ClipY2=MinVal(SrcY1+SrcHeight,DestY1+DestHeight)#IF SpriteHitPixels_DEBUG=trueBoxc DestX1,DestY1,DestX1+DestWidth,DestY1+DestHeight,False, Rgb(255,0,0)Box ClipX1,ClipY1,ClipX2,ClipY2,false#ENDIF// Translate the world space cords to local // image space cordinates
OffsetX Â =SrcX1 -DestX1
OffsetY Â =SrcY1 -DestY1
ClipX1 -=SrcX1
ClipX2 -=SrcX1
ClipY1 -=SrcY1
ClipY2 -=SrcY1
OldSurface=GetSurface()// Brute force scan through imagesfor ScanLPY = ClipY1 to ClipY2
 // Check if this row overlap rendertoimage SrcImage
for ScanLPX = ClipX1 to ClipX2
ThisPixel1=Point(ScanLPX,ScanLPY)if ThisPixel1!=SrcImageMaskColour
rendertoimage DestImage
 ThisPixel2=Point(OffsetX+ScanLPX,OffsetY+ScanLPY)if ThisPixel2!=DestImageMaskColour
STATUS=TRUE#IF SpriteHitPixels_DEBUG=falseeXITfor ScanLpY
#endif#IF SpriteHitPixels_DEBUG=truerendertoimage0dotc OffsetX+ScanLPX,OffsetY+ScanLPY,$00ff00;ThisPixel2 #endifendifrendertoimage SrcImage
endifnextnextrendertoimage OldSurface
endifendifendifendifEndFunction Status
Downloads
  The examples are attached to this post. Log in to download them.
This is an older code snippet that was originally written by Crystal Noir, it creates a type of 3D particle explosion using animated 2d sprites. I've tweaking the code and fixed some logic errors and this was the end result.
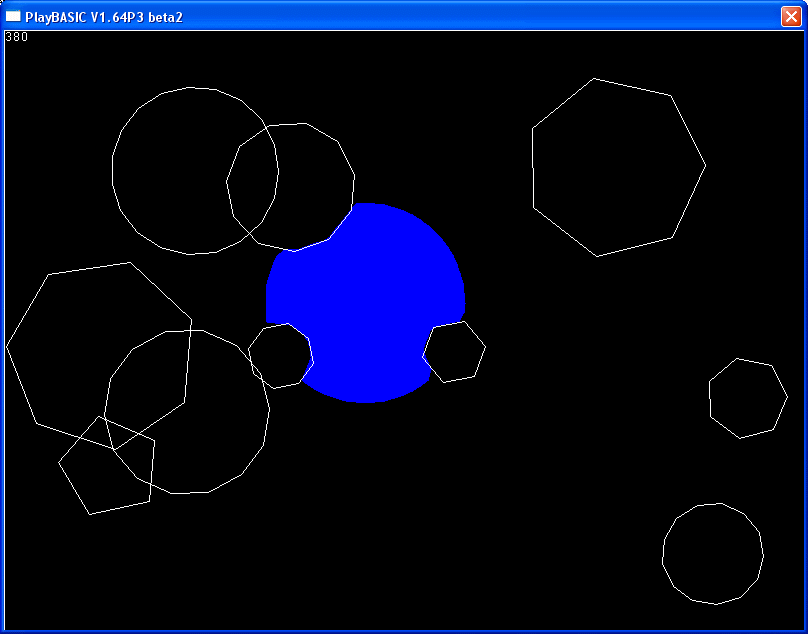
This example recreates a popular demo effect known as meta balls/blobs. The scene is calculated by working out the amount of energy that each pixel receives from the surround 'blobs' or lights. The more lights the more work each pixel has to be do.
So if you did all the work (calc the distance etc) in the inner most loops, you’d get a pretty heavy per pixel calculation. Such a loop would run slowly even in assembly/machine code. So what we need to do is come up with some ways we can simplify the inner loop to get the cost per pixel down as much as possible.
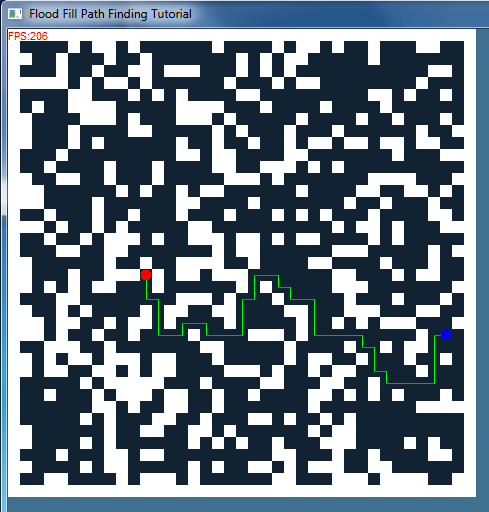
This code is a version of my flood fill path finding routine that was originally written way back in the late Amiga days, some 20 odd years ago now. The raw concept was inspired by the game Chaos Engine by the Bitmap Brothers, which featured a cooperative mode with a second AI player, even when playing in single player modes. What struck me was how well the AI player could fight and locate power ups, which seemed just like the a human player at the time. Today this kind of AI has is almost common place, but it seemed new back in the 16bit days. I don't actually know how Chaos Engine's AI algorithms work, just that it was seed for this idea. But like a lot of good ideas, this just ended up gathering dust on my legacy hard drive until now.
This example create a list of random positions then interpolates a sprite between each key frame in the set. This first version interpolates just the sprites coordinates/angle and scale, while the second version includes tint colour interpolation also.
This demo shows the core logic behind drawing radial lights in top down 2D game. The light source is made up of a group triangle fragments drawn in a circular pattern. So we just step around the edge of the circle and draw triangles from the center to the edges. This gives us an N sided polygon that represents our light in the scene, the more sides the accurate the circle will be mapped.
To make it act more light natural light, we need something to handle the occlusion/shadows. In PlayBasic we can use the ray intersection support found in the world commands. That means we define the "hard" parts of the world and by hard I mean zones where light is not allowed to go/pas through, by outlining them with lines. So when we draw our light, we run ray intersections along the triangle edges against the hard / occlusion world, if there's a collision we grab the intersection point which will clip our light map triangles for us.
This demo generates the occlusion world randomly, it's basically a cut'n'paste from the Projects/Worlds/RayIntersectWorld demo.
Release Type:
The source code & tutorials found on this site are released as license ware for PlayBasic Users. No Person or Company may redistribute any file (tutorial / source code or media files) from this site, without explicit written permission.